Graphical User Interface
Overview
Last year during competitions, we realised that the calibration process for our camera was extremely slow and tedious as we had to rely on VNC to display and control the RPi. This year, creating a graphical user interface (GUI) which can effectively streamline the process of debugging was a priority for us. Therefore we created a GUI which can be launched easily to stream frames from the camera at realtime. Furthermore, the calibration values can be tweaked through GUI and these changes will be reflected on the GUI immediately.
Functions
These functions were developed to simplify and automate the debugging process:
- Can be launched easily
- Select ROI to specify colour range
- Code is editable on laptop
- Dual screen to for ease of comparison, e.g. original frame and contour frame
- Notepad for recording of any important values during calibration
GUI
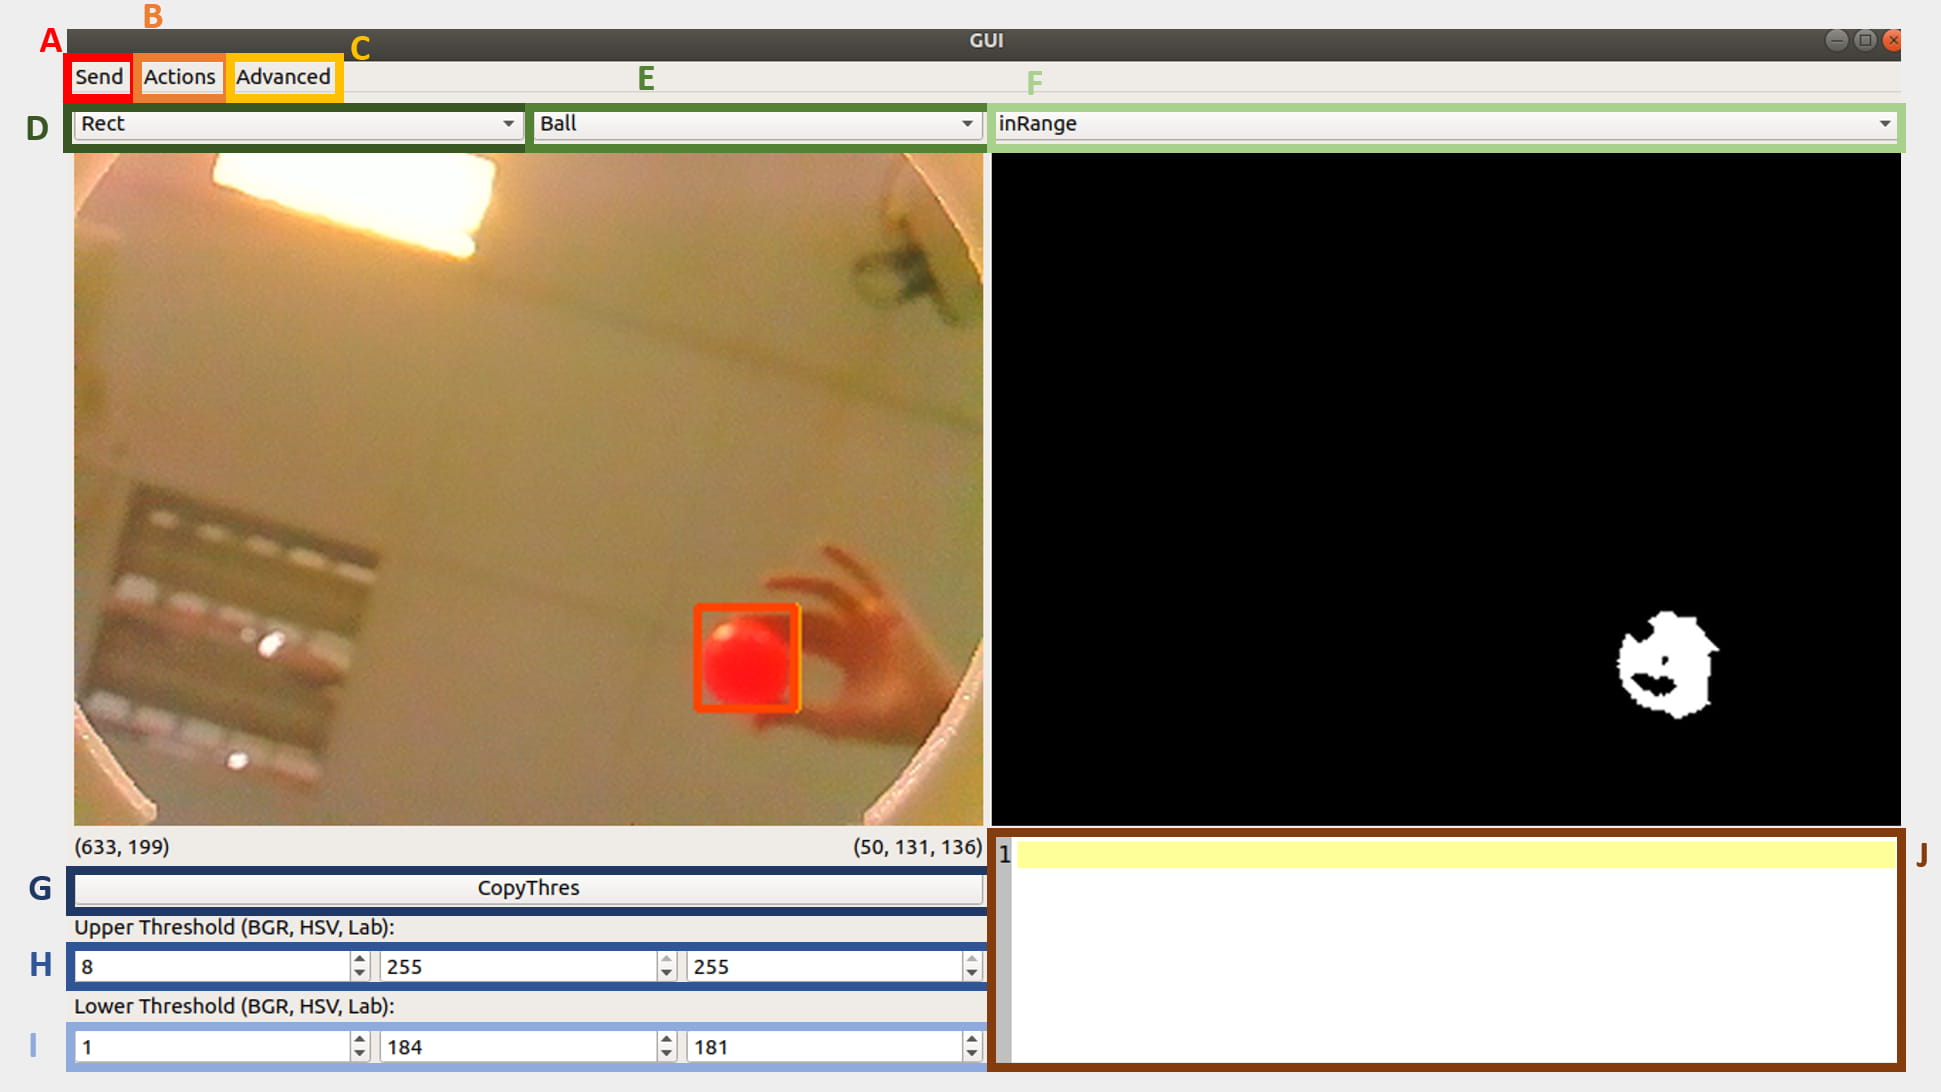
This GUI was mainly written in QT5 (C++). The design and functions of the GUI can be found in mainwindow.cpp. Streaming and displaying functions can be found in video.cpp whereas the notepad.cpp is the code for the notepad.

A) Send files to RPi
- Send camera.cpp
- Send camera.h
- Send main.cpp
- Send debug.cpp
- Save All calibration values to config.txt
- Send config.txt
B) Program Actions
- Makefiles on RPi
- Pause Stream from RPi
C) Advanced GUI options
- Dual Screen mode
- Camera Calibration options
D) Display options for left frame
- Original frame from the camera
- HSV colour space (cvtColor)
- Image smoothing (Blur)
- Image thresholding (inRange)
- Erode and Dilate on threshold frame
- Find contours from threshold frame
- Generate Rectangle around contour
E) Object to track or calibrate
- Ball
- Blue Goal
- Yellow Goal
- Field
- All
F) Display options for right frame (Similar to point D)
G) Copy Threshold values of selected region on the image frame to the calibration values
H) Upper bound of the values of the threshold
I) Lower bound of the values of the threshold
J) Notepad
Launch Protocol
- Launch GUI on laptop
- GUI read values from config.txt
- GUI SSH into RPi to launch the camera program
- Connect socket client (RPi) to socket server (laptop)
- Send frame information to the server (dimensions and channels)
- GUI streams frames from RPi in real-time
Comparison
We placed our GUI right next to OpenMV’s GUI as a comparison.
Development process
Initially, we started off with python as it was easier and quicker to develop with. However, after developing the first simple prototype with a frame display, we soon realized that the support for PYQT5 (Python) was meagre compared to QT5 (C++). Furthermore, we decided to standardise C++ as the code our programs will be written in (refer to program section for more details).
The GUI started off as a simple application containing a display frame, display options (refer to D in Figure) and spin boxes (refer to H & I in Figure) for calibration of the colour detection. After repeated usage of it during the development of the camera program, we added on other productivity features. For example, the dual screen was added when we found switching the display options on one frame to compare the results of the newly calibrated thresholding values to be especially troublesome.
Along the way, when improvements are made to the program, the GUI is updated accordingly. The camera calibration options came after realising that using raspicam instead of raspicam_cv allowed us to control the white balance, ISO and shutter speed of the camera.
While this version of GUI is incomplete, it is still able to serve its basic purpose of interfacing with the camera.